Serving GLM-5.3 at 607.8 tok/s across two Nvidia DGX stations with vLLM 翻译 背景介绍
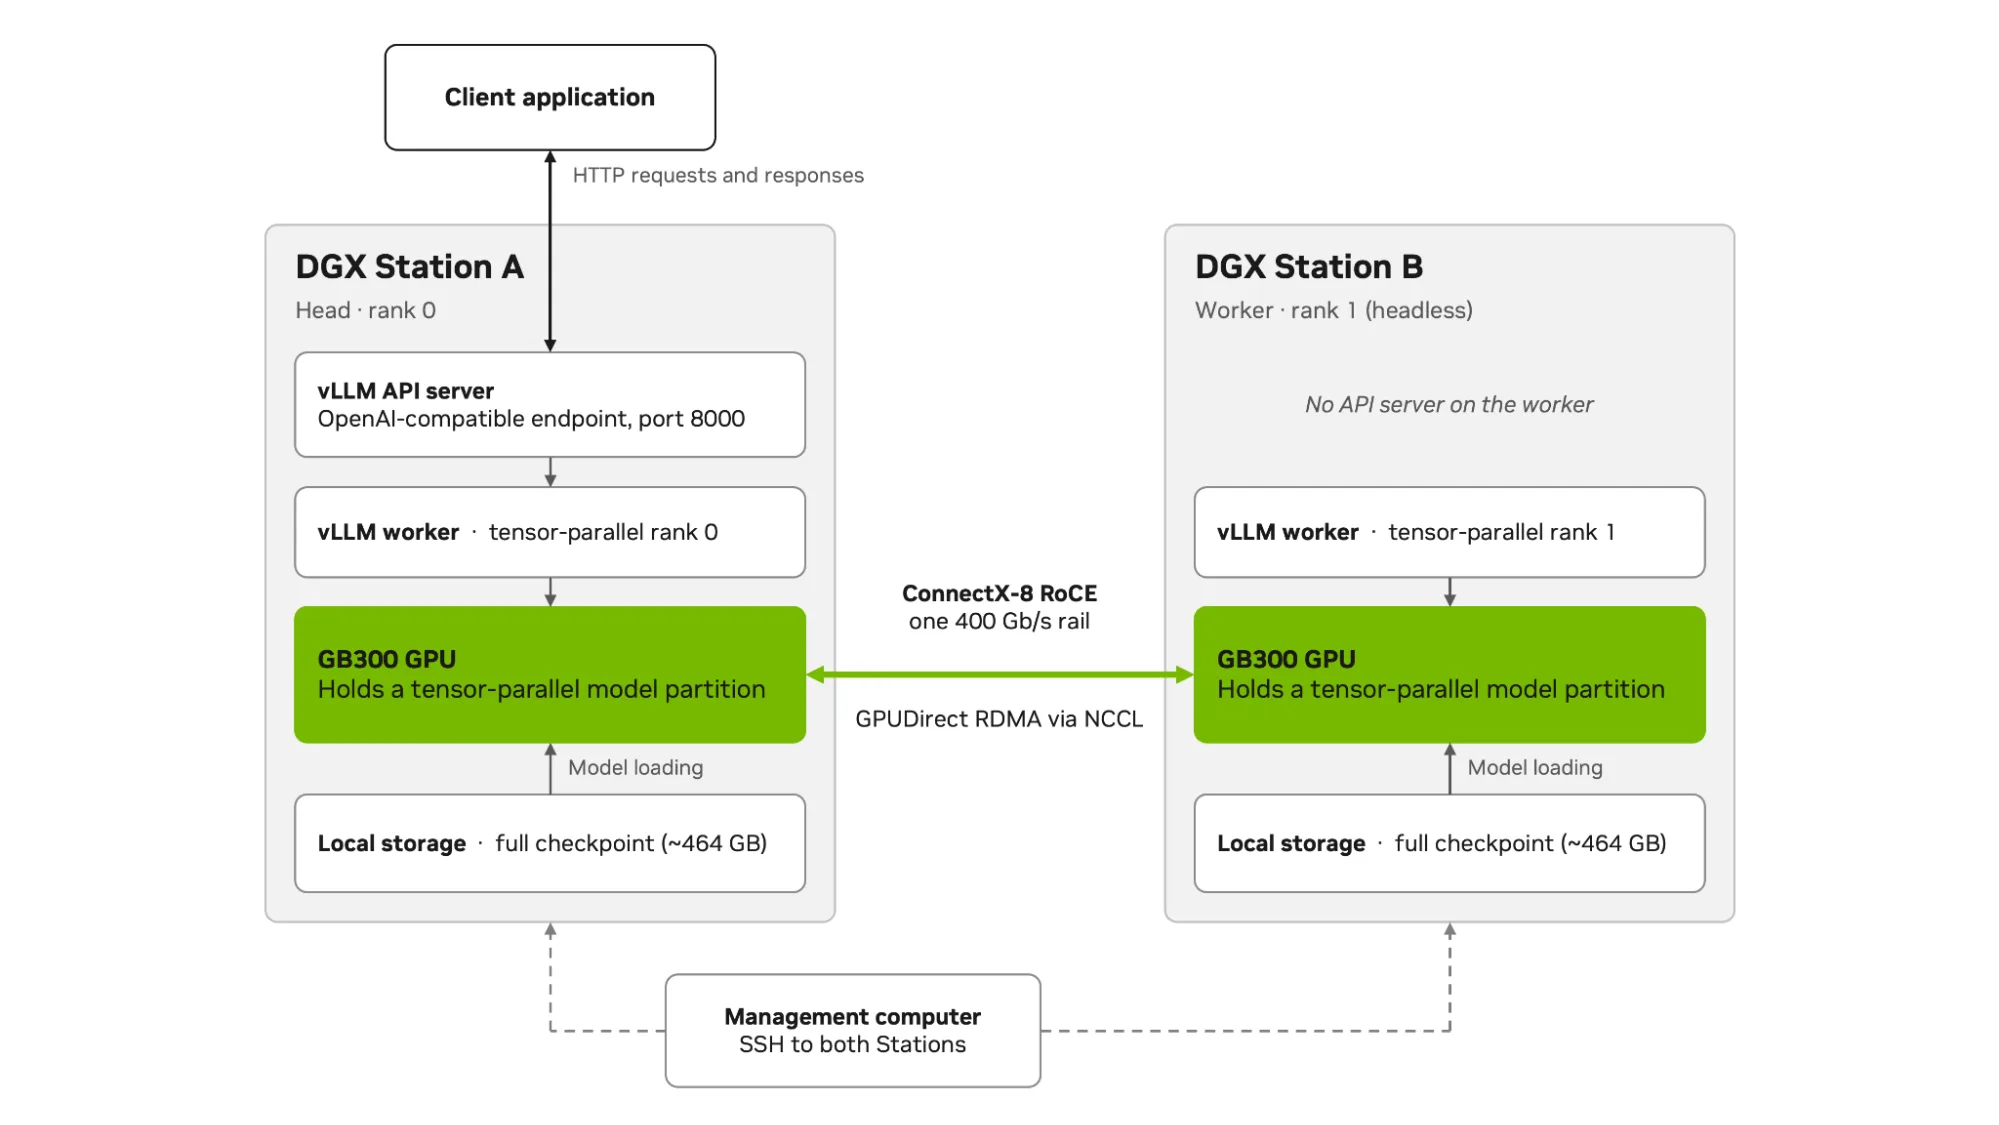
Running a frontier-scale model locally means keeping all its weights in GPU memory ; the largest models no longer fit on one machine . Two NVIDIA DGX Stations connected over ConnectX -8 RDMA serve one model through a single endpoint , with tensor parallelism splitting the model weights and computation across both GPUs .
The NVIDIA GLM -5.3 NVFP 4 model , a quantized version of Z .ai’s mixture-of-experts (MoE ) model , has 753 billion parameters , with 40 billion activated per token . Sparse activation reduces computation , but all model weights still need to remain available because each token can be routed to different experts . At about 464 GB , the checkpoint exceeds the 252 GB of HBM 3e on a single GB 300 GPU . This tutorial uses two DGX Stations to keep the weights in GPU memory , with CPU weight offload disabled .
Before starting , connect the two Stations with the Connect Two DGX Stations playbook .
This post shows how to serve GLM -5.3 locally across two NVIDIA DGX Stations with vLLM , send a request , and measure behavior under concurrent load . Tensor parallelism (TP =2) splits the model’s tensors across the two GB 300 GPUs . Both Stations compute every request , and Station A returns the answer through one OpenAI-compatible API . By the end , you’ll have a working endpoint and a baseline for how it behaves under load .
Figure 1. Two Stations serve one model: each GPU holds and computes part of the model over the selected RDMA connection. Their memories remain distinct
Prerequisites Two GB 300 DGX Stations running Linux , connected and validated with the Connect Two DGX Stations playbook , including its GPU-memory RDMA test on both rails .SSH and sudo access on both Stations with the same Linux username . Docker and the NVIDIA Container Toolkit come preinstalled with the DGX Station software stack . Allow outbound access to the container registry , Hugging Face , and package repositories .At least 464 GB of free disk space on each Station for its copy of the checkpoint , plus room for the vLLM container image and temporary files .Acceptance of the NVIDIA Open Model Agreement and the original GLM -5.3 license terms , listed on the model card . SPEED-Bench is governed by the NVIDIA Evaluation Dataset License Agreement .A Hugging Face account and read access token , with access to the gated cais /hle dataset : sign in , open its page , and select Agree and access repository . Step 5 downloads SPEED-Bench prompts from this dataset .The companion video follows the same workflow .
Step 1. Prepare the two Stations This tutorial uses a separate computer , such as your laptop , to manage both Stations . Start by opening an SSH session to each Station from that computer . Alternatively , work from a local terminal on each Station . Run every command in this step on both Stations unless it starts with “On A .”
The two Stations run the same container and checkpoint in different roles : Station A (rank 0) hosts the API , and Station B (rank 1) runs only a worker , with no API server .
First , check Docker access and collect the network values you’ll use later :
The ibdev 2netdev output lists the two direct rails , cx 8r 0 and cx 8r 1. Pick one for serving traffic , for example cx 8r 1, and note two things for it on each Station :
Its RDMA device , on the ibdev 2netdev line that ends with the rail’s name . In mlx 5_1 port 1 ==> cx 8r 1 (Up ), the device is mlx 5_1.Its IPv 4 address , on the ip -br addr line that starts with the rail’s name . In cx 8r 1 UP 192.168.101.1/24, the address is 192.168.101.1.The rail name and device are the same on both Stations ; only the IPv 4 address differs .
Next , create ~/glm 53.env on each Station . This file stores the values that later commands use :
Paste the following block and replace each <...> placeholder , keeping the quotes , with the values you noted .
For example , with the default addresses on cx 8r 1, Station A’s file starts like this . Station B’s file is identical except for RANK ="1":
MODEL _HOST is built from your home directory , and Step 2 copies the checkpoint over SSH to the same path on Station B .
On both Stations , load the values and check storage , connectivity , and baseline memory :
These checks catch cabling and addressing mistakes before they surface as NCCL timeouts . Expect a 400000Mb /s link , MTU 9000, successful jumbo-frame pings , and synchronized time . nvidia-smi should show no compute processes on the GB 300. On a Station with a display GPU , Xorg can appear on both GPUs with a few MiB .
Step 2 copies the checkpoint from A to B over SSH , so A needs passwordless access to B . On A , create a key without a passphrase (see SSH keys for details ), copy its public key to B after checking B’s host fingerprint , and confirm the login :
Step 2. Download and copy the model Tensor parallelism requires both ranks to run the same software against the same weights . Start by pulling the pinned image on both Stations :
The pull can take several minutes . Matching arm 64 digests mean both ranks run identical software .
On A , download the pinned checkpoint . At about 464 GB , it takes roughly an hour at 1 Gb /s , or about six minutes at 10 Gb /s :
When hf download prints Downloaded , copy the files to B . On A :
Each disk keeps the full checkpoint ; vLLM partitions the weights across the GPUs at load time , with no further quantization .
On A , compare both copies (the check reads B’s file list over SSH ), then validate the checkpoint :
MODEL _READY means both Stations hold the same file names and sizes in the expected layout . MIXED _PRECISION is expected : NVFP 4 quantization targets MoE-block linear weights and activations , not every tensor .
Step 3. Launch the distributed service This step turns two machines into one service : the same launch script runs on both Stations , reads ~/glm 53.env , and starts one vLLM rank on each . Two settings matter most if you adapt it : --max-model-len 98304, the context ceiling in tokens , which covers input plus output , and --gpu-memory-utilization 0.93, which gives vLLM 93% of GPU memory . If you change other flags , change one at a time and test again .
For the latest recommended configurations , see NVIDIA’s Local AI recipe repository .
On both Stations , create a file named ~/launch-glm 53.sh :
The script enables multi-token prediction (MTP ), a form of speculative decoding : the model’s MTP layer drafts four tokens per step , and vLLM verifies them with the full model before accepting them , so each step can produce several tokens . The gain depends on how often drafts are accepted , which varies with the prompt .
FP 8 KV-cache storage halves cache memory compared with 16-bit storage , leaving room for more tokens . Prefix caching is enabled to avoid reprocessing prompt prefixes the server has already seen . Paste the script below ; it checks your configuration , finds the RoCE GID index for the selected rail , and starts this Station’s vLLM rank in a container :
Run the script on B first , then on A :
Each command prints a container ID and returns immediately ; the service is not ready yet . B’s worker waits for A to join , then each Station loads its share of the weights from local storage , prepares kernels , and captures CUDA graphs . This takes several minutes .
On A , follow the log to see when the service is ready (--since hides output from earlier runs ):
When the log shows Application startup complete , press Ctrl +C to stop following it ; the service keeps running .
At this point one model spans two machines . Neither GPU holds a complete copy , and neither can answer a request alone : every token needs both ranks to exchange partial results over the RoCE rail .
The remaining GPU memory holds the KV cache , which stores the context of in-flight requests . The startup log reports its capacity (GPU KV cache size ). All requests in flight share it , so longer prompts or more users need more of it . If you run out , lower --max-model-len or send fewer requests at once .
Step 4. Verify serving and send a request On A , check the API (127.0.0.1 is A itself ):
HEALTH _OK proves that Station A answers . Next , on both Stations , check that the ranks communicate over GPU RDMA rather than falling back to TCP sockets . The check reads the NCCL logs that the launcher writes through NCCL _DEBUG =INFO , and the same block shows the loaded memory :
RDMA _CHECK _OK means the check passed with no warnings . In nvidia-smi , A shows the VLLM ::Worker _TP 0 process and B shows VLLM ::Worker _TP 1, one rank per GPU . The startup log reports about 218 GiB of weights per GPU , roughly half the checkpoint , which confirms that the model is split across the two GPUs .
On A , send a chat request through the OpenAI-compatible API :
The response should look like this :
finish _reason : stop means the model finished its answer instead of hitting the token limit . The request sets reasoning _effort to low in chat _template _kwargs . GLM -5.3 also accepts high and max , which let it reason longer before answering , at the cost of latency . Because the launcher enables tool calling (--enable-auto-tool-choice ), agent frameworks that use the OpenAI tools API can call the same endpoint .
Step 5. Concurrency and release resources AIPerf , the NVIDIA benchmarking tool for inference endpoints , measures throughput and latency . Installing it inside the serving container can change vLLM’s dependencies , so on A , install it in its own virtual environment :
The install should end with No broken requirements found .
AIPerf can send synthetic prompts or replay an existing dataset . This tutorial uses the 80 Coding conversations from SPEED-Bench , a set of real prompts built to evaluate speculative decoding , so MTP is measured on realistic text . SPEED-Bench’s preparation script fetches these prompts from several Hugging Face datasets , including the gated cais /hle : if you haven’t already , open its page and select Agree and access repository before you continue . Then , on A , log in to Hugging Face :
Next , download and prepare the dataset . See the official AIPerf guide for details :
On A , check the dataset and service . Continue when the check prints BENCHMARK _READY :
The full sweep covers concurrency 1, 8, 16, and 32. At each level , AIPerf sends 3×C warmup requests , then measures 10×C requests , where C is the concurrency . Some conversations are sent more than once at higher concurrency .
Benchmark requests use the model’s default reasoning effort (max ) and an 8,192-token output cap ; responses can finish before reaching it . Full sweeps can take several hours .
A two-hour request timeout leaves room for long responses , --server-metrics collects server counters used to measure MTP acceptance , and --export-level raw keeps each response for inspection .
For a quick test , run the block below on A with both containers running and no other API traffic . It tests C 1 and C 8 with prefix caching enabled , as in the reference measurements in Table 2, below .
AIPerf saves metrics , raw responses , and logs in the results directory . Warmup requests are excluded from the reported metrics .
Optional : Reproduce Table 2. In ~/launch-glm 53.sh from Step 3 on both Stations , keep --enable-prefix-caching and set --max-num-seqs to 16 or 32 for the corresponding group shown in the comments above . Before each group , stop and remove the current containers on A , then B (docker stop --timeout 60 "$CONTAINER ", followed by docker rm "$CONTAINER "). Relaunch the updated script on B , then A with bash ~/launch-glm 53.sh and wait for Application startup complete . On A , run the matching export CONCURRENCIES command from the comments , then rerun the AIPerf block .
To test without prefix caching , replace --enable-prefix-caching with --no-enable-prefix-caching in the Step 3 script on both Stations , then recreate the containers as above . Performance may differ from Table 2.
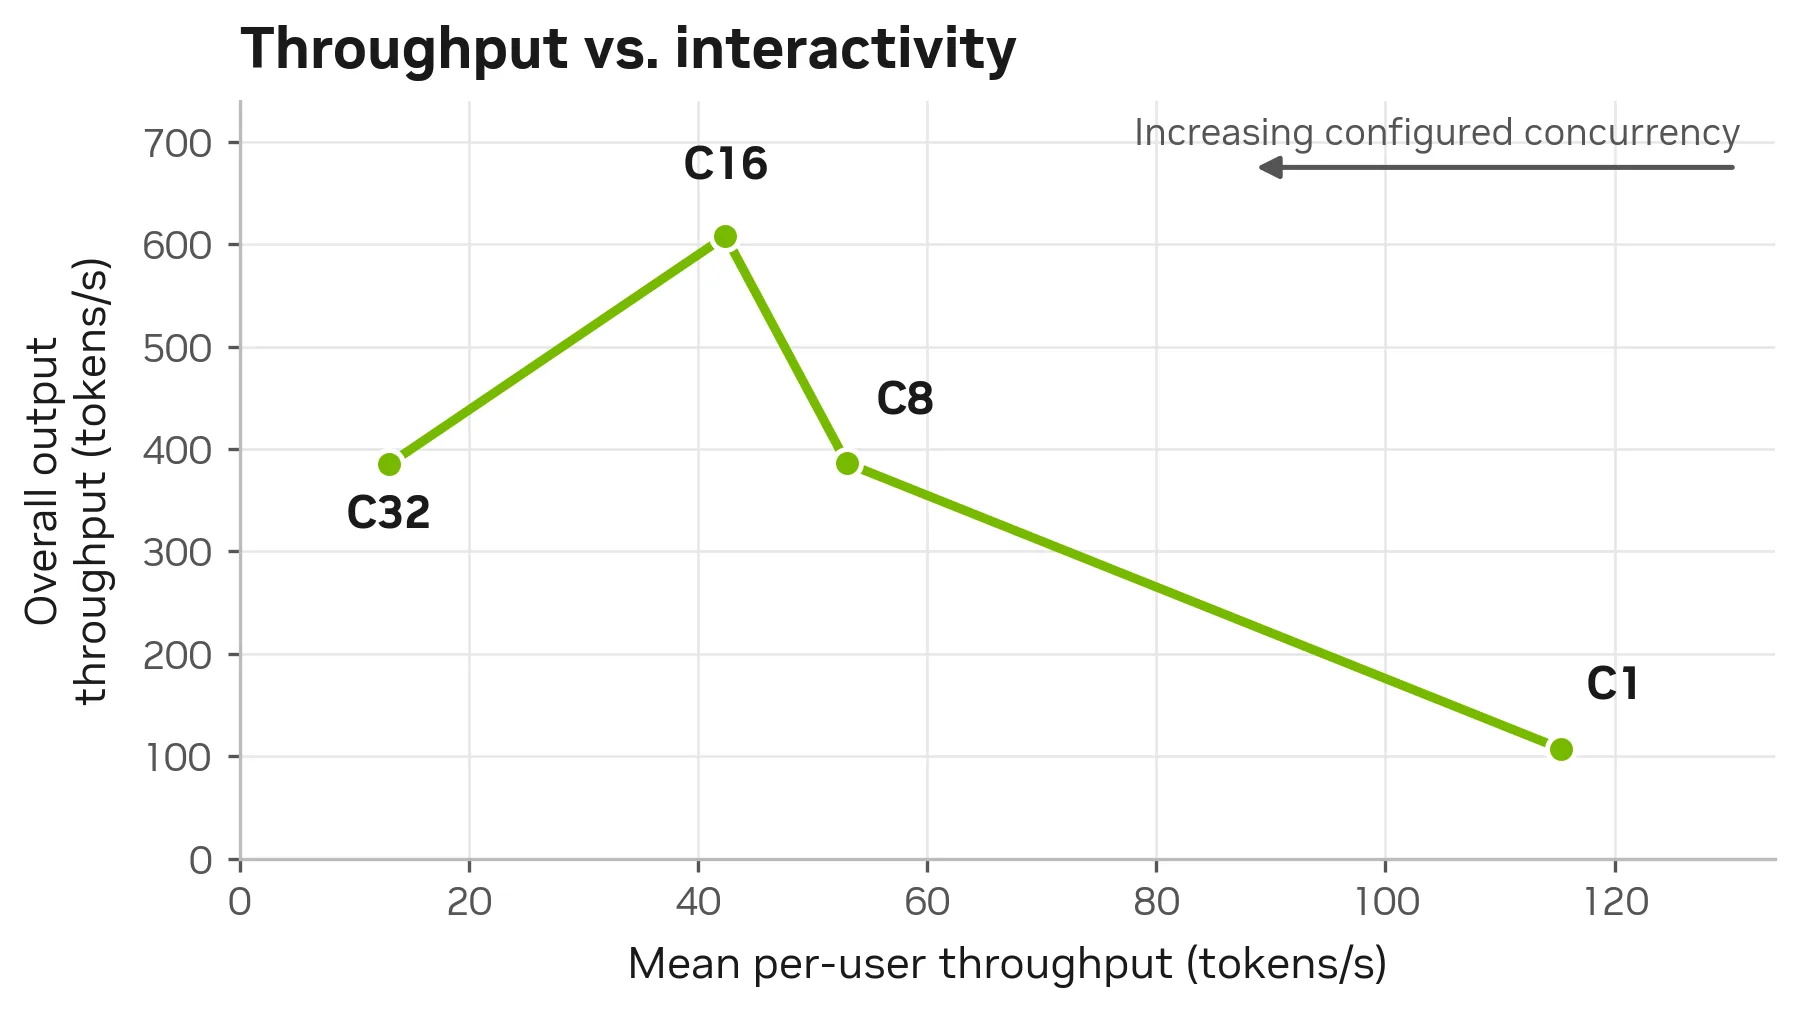
Figure 2 compares overall output throughput across measured requests with mean per-user throughput . Token counts include reasoning .
Figure 2. Overall output throughput versus mean per-user throughput on SPEED-Bench Coding, with prefix caching enabled. C1, C8, C16, and C32 denote configured concurrency Table 2, below , shows how throughput and latency change as more requests share the service .
Overall throughput peaks at 607.8 tok /s at C 16. It falls to 385.0 tok /s at C 32, where mean request latency is 453.5 s . Higher concurrency also reduces mean per-user throughput , from 115.3 tok /s at C 1 to 13.0 tok /s at C 32.
After the requests finish , stop the vLLM container on A , then on B :
The status should read Status =exited Running =false , with no vLLM processes in nvidia-smi ; the checkpoint , containers , and results stay on disk . To resume , run docker start "$CONTAINER " on B , then A , and repeat the Step 4 checks .
Troubleshoot common blockers Missing variables or SSH failure : source ~/glm 53.env after reconnecting ; verify A-to-B key authentication and B’s fingerprint .SPEED-Bench preparation fails with a gated-dataset error : sign in to Hugging Face with the same account , open the cais /hle page , select Agree and access repository , then rerun the preparation .Startup or RDMA check failure : inspect docker logs "$CONTAINER " on both nodes ; verify the checkpoint and the GID , and rerun the playbook’s validation (script 07).CUDA out of memory : lower --max-model-len or concurrency , then retest .
Put the endpoint to work You now have a 753-billion-parameter model running behind one local API on two NVIDIA DGX Stations , with every weight in GPU memory . That opens up work that’s hard to do on a hosted endpoint : running inference on sensitive or proprietary data , prototyping agents locally , and iterating on prompts without per-token costs .
Connect your own application using the vLLM serving documentation , then rerun AIPerf with your prompts to find the concurrency that fits your workload . A frontier-scale model is now ready to build on , right from your desk .